Pages

Thursday, June 9, 2011

gen new GUID c# script

public string GetnewGuid()
    {
        return System.Guid.NewGuid().ToString();
    }

BizTalk WCF-SQL Adapter to load a flat file into a SQL Database


Working with FlatFiles came through one of blog written by Thiago Almeida and found useful information and thought to share; below is extract from that

I have a flat file that contains a list of products. I need to load the contents of this flat file into a SQL Server 2008 table using BizTalk Server 2009 and the WCF-SQL Adapter. The table might already have some of the products in the flat file, and in this case the product row should be updated.


The data in my sample flat file was extracted from the Adventure Works sample database in the SQL Server 2008 samples in Codeplex, which gave me 504 products to play with.

Flat File and Debatching
-------------------------------------
As you might already know, messages with multiple items in them (multiple Products in this case) coming into BizTalk can be disassembled and debatched on their way in by the disassembler pipeline components. In this case, since it is a flat file that we are receiving, we will use the flat file disassembler component that comes out of the box with BizTalk.

In this post I want to go over loading the file into SQL Server in two ways: one by splitting the Product items into individual messages and loading them individually with the WCF-SQL Adapter; and another by not splitting the Product items and sending one single message to the WCF-SQL Adapter with all the products.

For that I created two flat file schemas, and both look like the below:

On one of the schemas the Product node has its ‘Max Occurs’ set to ‘unbounded’. The other schema has the Product node’s ‘Max Occurs’ set to 1. This property is what tells the flat file disassembler pipeline component if it should debatch the Products or not.

I created two BizTalk pipelines to handle the two different schemas. I dragged the flat file disassembler pipeline component to the disassemble stage of each pipeline, and selected the appropriate schema for each.


SQL Server Table and Stored Procedure
---------------------------------------------------------
On the SQL Server database side, we have a table called Product (what a surprise!) with the following columns:


We are going to call a stored procedure for each line in the flat file to load each product. An easy way to either insert the product if it doesn’t exist in the table or update it if it exists is to use the MERGE statement that is new in SQL Server 2008. So all we have in our stored procedure is the following:

CREATE PROCEDURE [dbo].[ADD_PRODUCT]

@ProductShortDescription varchar(50), @ProductFullDescription varchar(max), @UOM nchar(10), @UnitPrice money

AS BEGIN
SET NOCOUNT ON;
–Use merge statement to either insert or update product based on product short description

MERGE INTO Product AS Target

USING (SELECT @ProductShortDescription, @ProductFullDescription, @UOM, @UnitPrice)
AS Source(ProductShortDescription, ProductFullDescription, UOM, UnitPrice)
ON (Target.ProductShortDescription = Source.ProductShortDescription)
WHEN matched THEN

UPDATE SET ProductFullDescription = Source.ProductFullDescription, UOM = Source.UOM, UnitPrice = Source.UnitPrice
WHEN not matched THEN
INSERT (ProductShortDescription, ProductFullDescription, UOM, UnitPrice)
VALUES (Source.ProductShortDescription, Source.ProductFullDescription, Source.UOM, source.UnitPrice);
END

WCF-SQL Adapter Schemas
--------------------------------------------
To add the SQL Server schemas used by the WCF-SQL Adapter from the BizTalk solution you can right click on the BizTalk project, select Add, and then ‘Add Generated Items’. From there you can either choose the ‘Add Adapter Metadata’ or the ‘Consume Adapter Service’ options. They will both bring the ‘Consume Adapter Service’ wizard where you can connect to the target SQL Server database and select what items and operations you want to consume. In our case we are only interested on the ADD_PRODUCT strongly typed stored procedure:


This will give you a schema like the following for the ADD_PRODUCT stored procedure

Note that the ADD_PRODUCT node is the root node, and therefore can only exist once in the XML instances for this schema. This is the schema we are going to map to for the debatched Product information we get from the flat file schema with a max occurs of 1.  It is a straight map then from the single product flat file schema to the single stored procedure schema

That takes care of mapping the products when the flat file is being debatched into single product messages. Now what do we do about mapping all the products in the flat file to only one XML that is sent to the WCF-SQL Adapter? Here’s where the WCF-SQL Adapter’s composite operations come in handy. The composite operations in the adapter have been described on Richard Seroter’s book (free sample chapter on the WCF-SQL Adapter). I created a new schema with a root node ‘Request’ and a second root node ‘RequestResponse’. The first root node name isn’t really important, as long as the second root node name is the same as the first with a ‘Respose’ suffix. I then added the single ADD_PRODUCT schema as an XSD Import to my composite schema. This allows me to create an unbounded record under the ‘Request’ node and change it to have a data structure type of ns0:ADD_PRODUCT, and an unbounded record under the ‘RequestResponse’ node and change it to have a data structure type of ns0:ADD_PRODUCTResponse.


This allows us to map from the non debatched flat file schema to the schema created above

Calling the WCF-SQL Adapter
--------------------------------------------------------
After deploying the solution I created two receive ports and two respective receive locations – one of them configured with the debatching pipeline and the single product map, and the other configured with the single file pipeline and the composite operation map.


I then created two one way send ports with the WCF-Custom Adapter and the sqlBinding, each with a filter for one of the receive ports. The send port that filters on the debatched single product insert receive port is configured as follows, with the TypedProcedure/dbo/ADD_PRODUCT action:

The send port that filters on the single file with multiple products and composite operation map is configured as follows, with the CompositeOperation action:

Both send ports had a binding type of sqlBinding of course, with the default values (make sure useAmbientTransaction is enabled so that the stored procedure calls are inside a transaction):

Transactions and Conclusion
---------------------------------------------
So when we debatch the Products flat file on the way in we end up with multiple concurrent calls to the stored procedure via the WCF-SQL Adapter, each in its own transaction

When we map the entire file to the composite schema we end up with one transaction that wraps around all the stored procedure calls:

If we monitor the Transactions/sec for the database we see barely any activity when we use the single file method:

If we use the debatch multiple message method we some spikes as the multiple transaction to the database are made

As expected the single file method performs much faster for loading the 504 rows into the table. By placing a datetime column on the products table I could see the difference from the first insert to the last is only 254 milliseconds. With the debatch method BizTalk goes through the debatched records at a much slower pace taking around 16 seconds to load them all, since it has to map each debatched message, route multiple messages to the send port, create multiple transactions against SQL Server, etc.


After looking into it a bit more I also noticed that for the debatched scenario the message delivery throttling and message publishing throttling were kicking off for the BizTalk host loading the messages into SQL Server. By simply changing the number of samples that the host should base its throttling decision on to something over the 504 records being inserted the time for the debatched inserts went down to 4 seconds from the 16 seconds mentioned above:

The debatch method is still useful in many situations – if you need to perform extra steps for each message in the batch, or if your DBAs require one transaction for each stored procedure call, etc.

WCF SQL Adapter using OUTPUT parameters rather than a SELECT statement

Recently working on one of the task faced issue, I came through the direction of Thiago’s article on the WCF SQL adapter; which is a very good example. what happens as shown below (ref);

ALTER PROCEDURE [dbo].[ADD_PRODUCT]
@ProductShortDescription varchar(50),
@ProductFullDescription varchar(max),
@UOM nchar(10),
@UnitPrice money

AS
BEGIN
SET NOCOUNT ON;

–Use merge statement to either insert or update product
–based on product short description

MERGE INTO Product AS Target
USING
(SELECT @ProductShortDescription, @ProductFullDescription , @UOM, @UnitPrice)
AS
Source(ProductShortDescription, ProductFullDescription, UOM, UnitPrice)
ON
(Target.ProductShortDescription = Source.ProductShortDescription)
WHEN
matched THEN
UPDATE
SET ProductFullDescription = Source.ProductFullDescription , UOM = Source.UOM, UnitPrice = source.UnitPrice
WHEN
not matched THEN
INSERT
(ProductShortDescription, ProductFullDescription, UOM, UnitPrice)
VALUES
(Source.ProductShortDescription, Source.ProductFullDescription, Source.UOM, Source.UnitPrice);
SELECT ‘HELLO’ AS Hello —Added to send a value back in the response
END

I had to change the SQL schema too, as shown below.

Now when I fired up the same example I got the similar error to what my colleague has got namely;

“The adapter failed to transmit message going to send port "InsertProductSingleFile_WCFSQL" with URL "mssql://.//BT09WebcastsInvoice?". It will be retransmitted after the retry interval specified for this Send Port. Details:"Microsoft.ServiceModel.Channels.Common.InvalidUriException: Timeout expired. The timeout period elapsed prior to obtaining a connection from the pool. This may have occurred because all pooled connections were in use and max pool size was reached. —> System.InvalidOperationException: Timeout expired. The timeout period elapsed prior to obtaining a connection from the pool. This may have occurred because all pooled connections were in use and max pool size was reached.”

I executed sp_who in SQL management studio to find out how many connection to the database had been opened by the composite WCF-SQL adaptet. I found the the composite adapter had created 100 connections ( the maximum that was set in the WCF-Custom binding).

Why is the WCF-SQL adapter creating so many connections when a record set is returned? I think the answer is that a separate connection is opened until all the results are returned but unfortunately we run out of connections before the entire composite transaction has finished.

UPDATE 2011-04-08 Communication from Thiago
“…, it’s a known limitation:
http://msdn.microsoft.com/en-US/library/dd788151(v=BTS.10).aspx

I guess they would tell you to increase the MaxConnectionPoolSize value to a value larger than the number of operations you expect to bunch together, the max value being 2,147,483,647. “ }

next I changed the stored procedure to return the result using an OUTPUT parameter instead of a SELECT statement like so;

ALTER PROCEDURE [dbo].[ADD_PRODUCT]
@ProductShortDescription varchar(50),
@ProductFullDescription varchar(max),
@UOM nchar(10),
@UnitPrice money,
@Hello varchar(50) OUTPUT

AS
BEGIN
SET NOCOUNT ON;
–Use merge statement to either insert or update product
–based on product short description

MERGE INTO Product AS Target

USING
(SELECT @ProductShortDescription, @ProductFullDescription , @UOM, @UnitPrice)
AS
Source(ProductShortDescription, ProductFullDescription , UOM, UnitPrice)
ON
(Target.ProductShortDescription = Source.ProductShortDescription)
WHEN
matched THEN
UPDATE
SET ProductFullDescription = Source.ProductFullDescription , UOM = Source.UOM , UnitPrice = Source.UnitPrice
WHEN
not matched THEN
INSERT
(ProductShortDescription, ProductFullDescription, UOM , UnitPrice)
VALUES
(Source.ProductShortDescription, Source.ProductFullDescription,UOM, Source.UOM, Source.UnitPrice);
–SELECT ‘HELLO’ AS Hello —Added to send a value back in the response
SET @Hello = ‘HELLO’
END

Running the sample again, the data is inserted in to the database without any error because only one pooled connection is created.

In summary if you use a WCF-SQL adapter with a composite operation and you want to return a result set then you must do this using OUTPUT parameters rather than a SELECT statement. if you don’t then you risk running out of connections.


Friday, May 27, 2011

Source Links property in BizTalk Maps

Here’s a cool mapping tip I found on working in BizTalk Mapping.

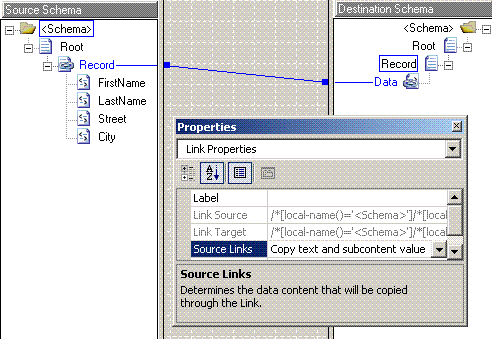
While mapping an element from the source schema to the target schema, it is possible to copy either the value contained within the element or the element name itself.

You achieve this by setting the Source Links property of the link connecting the elements as shown below.


In the above figure above the value mapped to the target element will be “CustomerName”.


The values that can be set are:
1. Copy text value – which is the default that copies the content of the element
2. Copy name – copies the name of the source node instead of its value
3. Copy text and subcontent value – concatenates the value of all child nodes

Now you might be wondering what is this 3rd value (Copy text and subcontent value) that can be set…
This is used if you want to concatenate all the child element values of the source node into a single element in the target as shown below.
 Here is an example:

Input Message

FirstName_0
LastName_0
Street_0
City_0


FirstName_1
LastName_1
Street_1
City_1


Output Message

FirstName_0LastName_0Street_0City_0


FirstName_1LastName_1Street_1City_1


Now here is another interesting mapping


The mapping above transforms the elements in the source schema into a key-value pair as shown below.

Each element node from the source schema links to the two elements in the target schema, one link copies the node name and the other copies the node value.

Input Message

FirstName_0
LastName_0
Street_0
City_0


Output Message

FirstName
FirstName_0


LastName
LastName_0


Street
Street_0


City
City_0

Friday, May 13, 2011

USING XSLT Call Template v/s Inline XSLT

SELECTING FROM AVAILABLE SCRIPTING LANGUAGES

An XSLT call template builds one or more output nodes from scratch. The two XSLT scripting methods differ in whether or not an input parameter can be used.

Inline XSLT, accepts input via XPATH queries but does not accept input parameters. XSLT call templates accept input via both methods. The XPATH query you will see in the inline XSLT discussion is the same type as would be used in the XSLT call template
 
Simple XPATH queries are especially useful when creating outbound EDI segments like the REF or DTM segments, because you can collect data from source nodes that are not in the current context node of your source data and use this data to create repeating instances of a single output node.
 
Inline XSLT scripts are different from those created with the other scripting languages, because they do not use input parameters.
 
Here are two notes to keep in mind when working with XSLT call templates and inline XSLT.

First, when input parameters are used in an XSLT call template, the input values arrive through links from the source nodes to the Scripting functoid. If the source data is in a loop, the value input to the Scripting functoid depends on how many times the loop has been accessed before the script is executed. Second, when you
need a system variable such as System Date as input, you may have to use a call template and not inline XSLT. Releases of BizTalk that do not use Version 2.0 or higher of XSLT do not have access to XSLT functions that can access system variables.

Monday, March 14, 2011

Schema Design Pattern : REUSABLE STRUCTURES

So, lets create reusable structures. Open the editor by creating a new schema. When the schema appears in the Editor you get a Schema node and the Root Node. What we will do is to create our schema under the Root Node and then we add our global types at the same level as the Root Node.

So, lets create a global record, a global element and a global attribute - just to make sure we have all of our bases covered. Once these have been created then I will show you how we can use those within our schema.
Before we create these global items we need to keep in mind that you can create global types using records, elements or attributes. However, types created from elements can only be used in elements, records can only be used in records and attributes can only be used in attributes. This is especially important to keep in mind when importing a schema for reuse since you will need to know the types that are available for reuse since they will only be selectable for similar types.

First, lets create a global type. Create a record named Employee directly below the Schema node. Below the Employee record add three elements; EmployeeID, FirstName and LastName. Click on the Employee node and in the properties window, select the Data Structure Type and enter EmployeeType. This will be the name of the complex type that will be used when reusing this type.

Second, lets create a global element. Create an element named Company and place this directly below the Schema node as well. With elements and attributes you do not need to name it as you do with a Record (there is no Data Structure Type property on elements or attributes).

Third, lets create a global attribute. Create an attribute named EmployeeType directly below the Schema Node. Click the Derived By drop down in the properties window and select Restriction. This will expand the properties to include a Restriction Section. Set the Maximum Length to 1.

We have now created all of our reusable types, so now lets use them.

To begin with we will use our global element. Click on the Root node that was created with the Schema and add a Child Field Element. Click the Data Type drop down and in the list there will be an entry that says "Company (Reference)" - Select this value. We have now linked this element with the global element. Also, notice that the name of the element has changed to match the name of the global element.

Next, we will use our global records. Lets add two child records. The first will be named FTE and the second will be named Consultant. Lets start with the FTE record. Select the Data Structure Type drop down in the properties window and select EmployeeType (ComplexType). Repeat the same process for the Consultant Record. We now have two records re-using a the same global type.

Lastly, lets use the other global items that we created earlier to decorate the FTE record. The process is the same for attributes and elements. So on the FTE record add an attribute by right clicking on the FTE Record and selecting Child Field Attribute.

Once the attribute has been added, click the Data Type drop down in the properties window. At the bottom there will be an entry that says "EmployeeType(Reference)" - Select this value. We have now linked this attribute with the global attribute. Again, notice that the name of the attribute has changed to match the name of the global type. Here is a screen shot of what it looks like so far.
There is one last thing to look at while we are working on our attribute. You may have noticed that the properties for this attribute are read only. By changing the properties on the global definition we can affect the properties of the items that use these types. When we created the global attribute we selected Restriction and set the Maximum Length to 1. Change this value (or any other) and you will see the change flow through to be reflected in the attribute that points back to the global attribute.

What it really comes down to is that there are two different ways to select global types depending on what the type is. If the type is a record then select the globally defined type from the Data Structure Type property. If the type is a element or attribute then select the globally defined type from the Data Type property. Keep in mind that once the global type has been assigned then any changes to the globally defined type will appear in any of the locations in which the global type has been used.

So, now that you have seen the process all that you need to do is to follow any of the patterns described earlier in this series and create the schema you want..

There is one thing we still need to be aware of. If you are importing a schema in order to use global types defined in another schema file and there are promoted properties defined on any of the global types you will need to re-promote them in your schema for the promoted properties to take effect.

Monday, March 7, 2011

Working with Custom Pipeline Components in BizTalk

As you know, a change was made to how custom pipelines components behave in BizTalk Server. Now they can be placed in the Global Assembly Cache (GAC) as well as in the \Pipeline Components directly. So what does this mean? Put them in both place, one place, who knows?

In general, when working with custom pipeline components on a development system the components must be placed in the \Pipeline Components folder to be available for the designer. When working on a non-development server, putting the components only into the GAC can save on deployment time. Although this is not really the approach the help guide says (under Developing Custom Pipeline Components), this approach works great in most cases.
Today, I found a big GOT YOU with this approach if the custom component is not put into the GAC before it is used inside Visual Studios. I found that you must GAC the custom pipeline components BEFORE adding them to the Visual Studios Toolbox or you can run into runtime issues later on.
First, let us take a look at what happens when you add an unsigned and unGACed custom pipeline component to a project.
When you add the component to the Toolbox and drag it onto the Visual Studio design surface, a reference is added to the pipeline component. As seen below, when the component is not signed and not in the GAC a reference is added to the component in the \Pipeline Components folder.

Now, let us take a look at what happens when you add a signed and GACed custom pipeline to a project.

When you add the component to the Toolbox and use it in a pipeline, a reference is added to the pipeline component (same as before). But this time, the signed and GACed pipeline is referenced to the GACed version of the pipeline component.
So why does this matter? The problem I ran into was I added my custom pipeline component to my solution before I signed it and put it in the GAC. So when I went to deploy my solution to the development server with the pipeline component only in the GAC, I got a .net runtime error saying it could not find the pipeline in the \Pipeline Components folder.
Something else to point out is that the pipeline must be put into the GAC before you add the pipeline component to the Toolbox. Just being signed is not good enough.
The overall moral of the story is: If you only want to put your custom components into the GAC make sure you GAC it before you use it inside the designer.